Site Tags & Categories displays the list of all tags, categories or other terms that are defined on the site. Optionally, registers a new taxonomy.
Note, use Post Tags & Categories action to display the list of associated with the current post.
First, we choose the taxonomy whose terms we want to display. WordPress comes with two built-in taxonomies: post tags and categories. In addition, we can define and use custom taxonomies.
Registering a custom taxonomy
There is no need to fit everything into tags and categories. We can easily define and use additional custom taxonomies.
For example, we might define the Activities taxonomy with terms like “exploring caves”, “trekking”, “mountain climbing” that we then assign to posts that are describing our adventures.
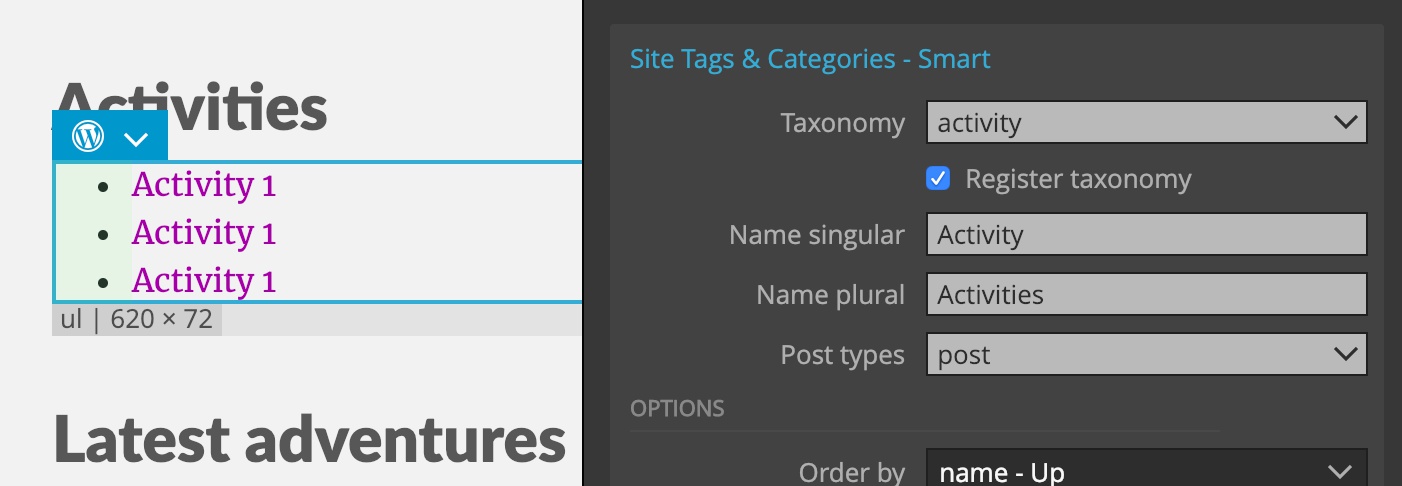
To register a taxonomy we need to specify the name of a single term instance, for example “Activity” and plural name for the whole term class, for example “Activities”.
Then we have to list the post types where the taxonomy will be used.
Selecting taxonomy terms
Next we can specify how to fetch and display the terms.
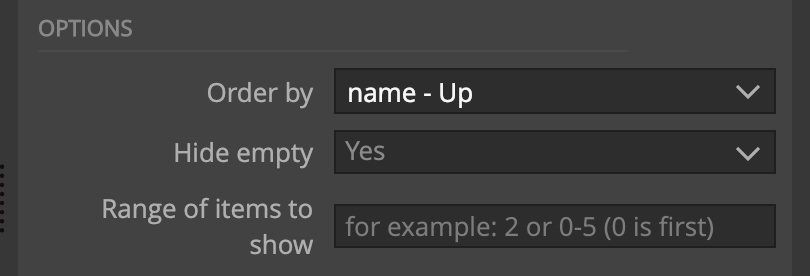
Order by lets us choose the order of displayed terms. If we choose Meta field value we also have to specify the meta field name and optionally tell WordPress that the field contains numeric values.
Hide empty will omit any terms that don’t have any posts associated with them.
We can also decide to display only a range of returned terms.
This is useful when we need to split the display of terms in two separate containers / lists.
For example, let’s say we have two columns and we want to display the first five terms in the first column and the rest in the second:
div.left
    a Term 1
    a Term 2
    ...

div.right
    a Term 5
    a Term 6
    ...
To do that we add one Site Tags & Categories with the range 0-4 to the first column and another Site Tags & Categories with the range 5-10 on the second column.
div.left
    a Term 1    <— Site Tags & Categories, range "0-4"
    a Term 2    <— Don't export
    ...

div.right
    a Term 5    <— Site Tags & Categories, range "5-9"
    a Term 6    <— Don't export
    ...
Display structure
Next we get to customize the display structure.
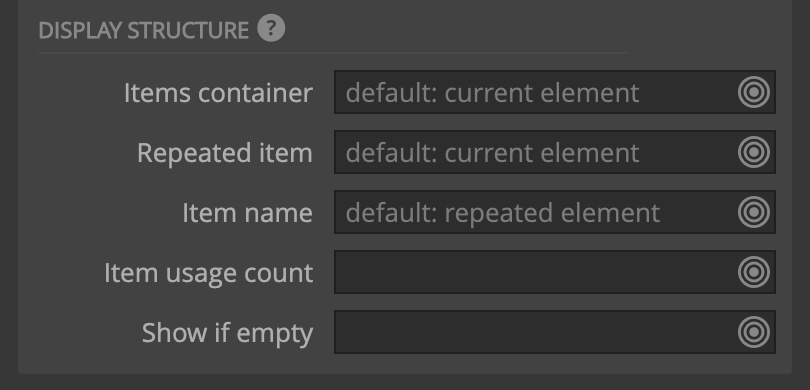
By default, the main Site Tags & Categories element is repeated for all returned terms. Term link and name is added to the first link element within the repeated element, or to the repeated element itself.
We can customize this by selecting:
The items container is the element that is only shown if terms are returned.
Repeated item is the element that is repeated for each displayed term.
Item name is the element that should display the name of the term. By default, that is the link element, or the repeated element.
Item usage count is the element that should display the count of posts associated with the term. By default, this information is not displayed.
Show if empty element is shown if no terms are found. This element must be on the same level as the container element.
Don’t forget to add “Don’t export” action to any placeholder items that we don’t want to have in the theme.
Let’s take a look at the example with the following HTML structure:
<ul>
    <li>
        <a href="#">Activity 1</a>
    </li>
    ...
</ul>
To display a list of terms we just add Site Tags & Categories to the <ul> element and select the first <li> element as the repeated item:

The action will figure out by itself that it needs to display the name and link of the term on the <a> link element inside the <li>.
But what if we want to display the term count next to the name?
To do that we have to modify the structure of the repeated <li> element:
<li>
    <a href="#"><span>Activity</span> (<span>1</span>)</a>
</li>
We enclosed the name and the count number into two separate <span> elements so that we can target them in Display settings:
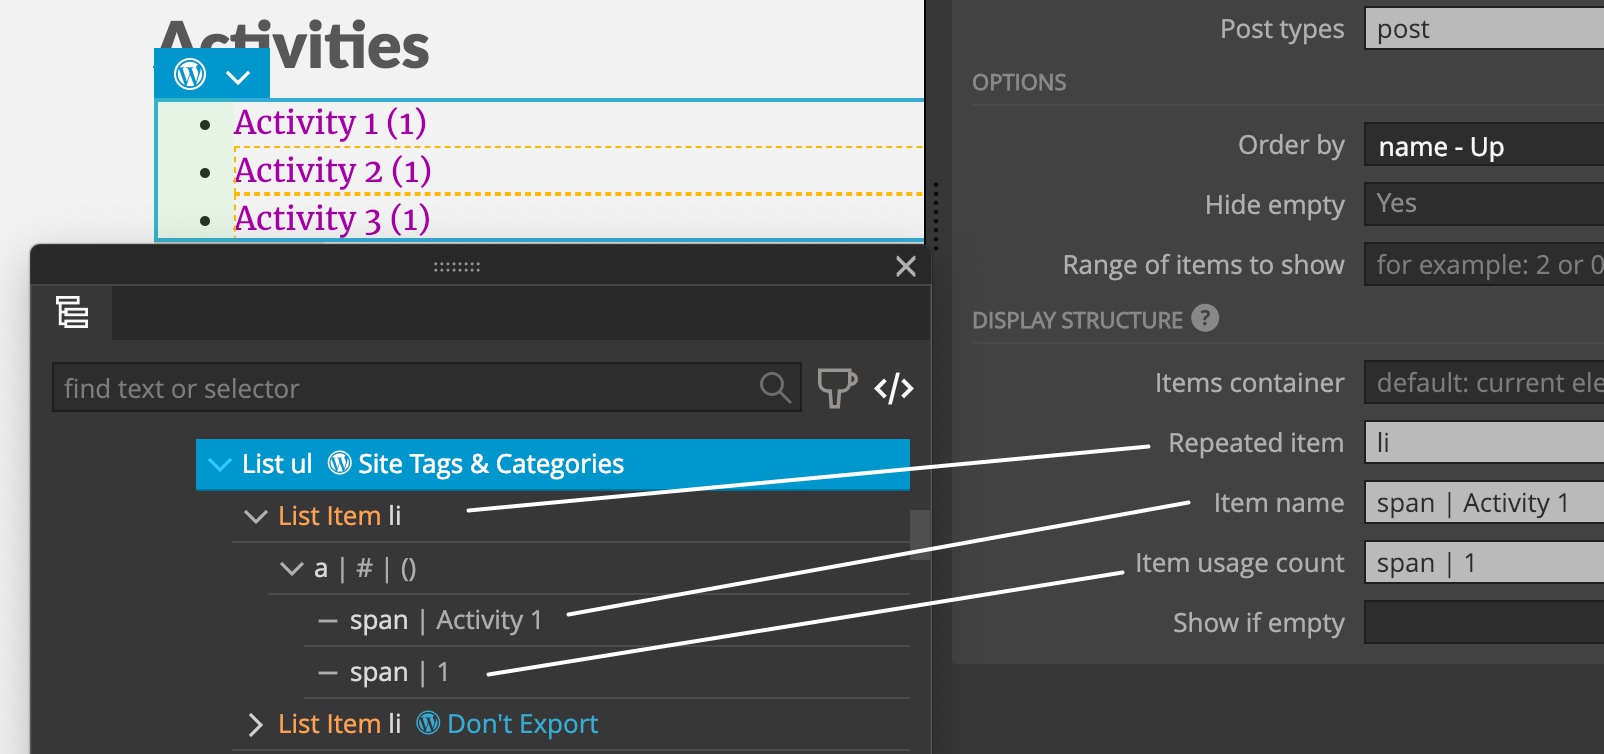
This will output a nice term list with names, counts and links that take us to the list of posts for the chosen term:

The generated PHP code is:
<?php $terms = get_terms( array(
        'taxonomy' => 'activity',
        'orderby' => 'name',
        'order' => 'ASC',
        'hide_empty' => true
) ) ?>
<?php if( !empty( $terms ) ) : ?>
    <ul>
        <?php foreach( $terms as $term ) : ?>
            <li>
                <a href="<?php echo esc_url( get_term_link( $term ) ); ?>" rel="tag"><span><?php echo $term->name; ?></span> (<span><?php echo $term->count; ?></span>)</a>
            </li>
        <?php endforeach; ?>
    </ul>
<?php endif; ?>