WildMusic – Interactions tutorial
A step-by-step tutorial about adding web interactions to the WildMusic landing page.
Before we start
What you’ll learn?
By following this tutorial you will learn how to:
- Activate Pinegrow Interactions in your project
- Reveal title cutout with hover
- Pinning a scroll scene
- Synchronize animations with scrolling the scene
Try the project online
Play with the finished project in Pinegrow Online:
What you’ll need?
Of course, you can just watch the tutorial to see how Pinegrow Interactions work. But we recommend that you follow along the tutorial, doing all the steps on the provided landing page. To do that, you’ll need:
- Pinegrow Web Editor, either a free trial or activated license that includes Pinegrow Interactions.
- Download the example WildMusic landing page without interactions. Unzip the file and open it as a project in Pinegrow Web Editor.
- You can also download the finished project as a reference.
If you already have Pinegrow Web Editor, but don’t have the Interactions add-on you can start a trial in Support -> Purchase & Activate under Add-ons: Interactions.
Want to know more about Pinegrow Interactions?
Visit the Pinegrow Interactions Documentation portal to learn more about Interactions, actions, licensing, API and more.
Need help?
Post any questions and feedback about this tutorial to a dedicated Pinegrow Forum topic.
Updates
The following changes to the tutorial were done after it was published. These changes are not included in the videos.
Do not use Direction = Auto on Scroll Scenes
In some situations, Scroll scene direction Auto has problems with correctly detecting the scroll direction. It is therefore recommended to explicitly set the direction to Vertical or Horizontal. Please do that with all Scroll scenes in this tutorial.
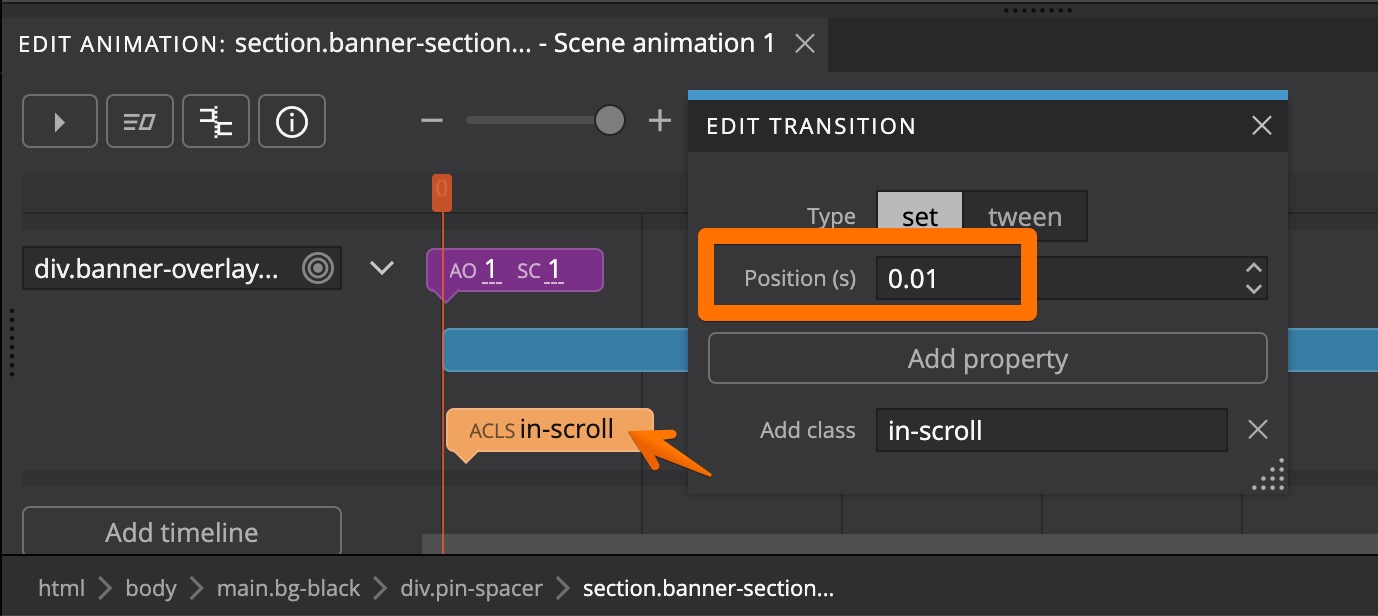
Change for Set at position 0 in Pinegrow 5.98+
GreenSock GSAP changed the way how Sets at the start of the timeline are rendered when the animation is reversed back to the starting position.
Until now the initial state of such sets was restored when backing up to start. For example, take a timeline with Set AddClass in-scroll at position 0. The class in-scroll would be added when the animation started playing and would be removed when the animation was reversed back to start.
This behavior can be confusing and was therefore changed by the GreenSock team, so that Sets at 0 are no longer reversed. In our example, this means that the class in-scroll will not be removed.
There are two ways to have this happen with the new behavior:
- Put the set slightly after start, for example at
0.1s. When the animation reverses back at 0 it will correctly restore the state to the state before the Set. - Use Tween transform instead of a Set. Tweens animate elements from the initial state to the target state, and when replayed backwards, animate the element back to the initial state.
This change affects the WildMusic example. There the Set that adds the in-scroll class was moved slightly after the start of the timeline.
Update to Bootstrap 5 and further tweaks
Text in Steps 3 and 4 is updated, but the videos are not. For steps 3 and 4 we recommend following the textual instructions alongside the video.
Watch the whole tutorial
The tutorial has 5 parts, total length is around 30 minutes.
We recommend that you watch the whole tutorial and follow along with the provided project.
Alternatively, you can scroll down past the video to watch and read transcripts of individual tutorial parts.
The following section contains the videos and transcripts of individual parts of the tutorial:
1. Introduction
Hi, today I have come up with another tutorial for a new interactive landing page. I will show you more ways to add interesting interactions using Pinegrow Interactions, a GreenSock powered visual editor for web interactions.
In this tutorial you’ll learn how to easily add engaging interactions to your websites, without any coding.
For this tutorial we’ve designed and developed a landing page for a fictional company called WildMusic. I’m going to show you different ways to add parallax scroll effect, sticky section effect, simple mouse interaction and content reveal effect.
If you wish you can download the starter webpage without the interactions and follow along with this tutorial. The link is provided in the video description.
You can check the final webpage as well with all the interactions, to get the idea about the end result. If you check the final result you can see:
- Banner element has reveal/hide effect on mouse interaction
- Banner element also has zoom out effect on scroll
- This section also remain fixed for a while scrolling
- Menu has reveal/hide effect on scroll
- Below the banner, elements have vertical and horizontal parallax effects. And other contents have usual content reveal effects.
So let’s get started. Open the starter project and begin adding amazing interactions with Pinegrow Web Editor.
2. Header Cutout Reveal
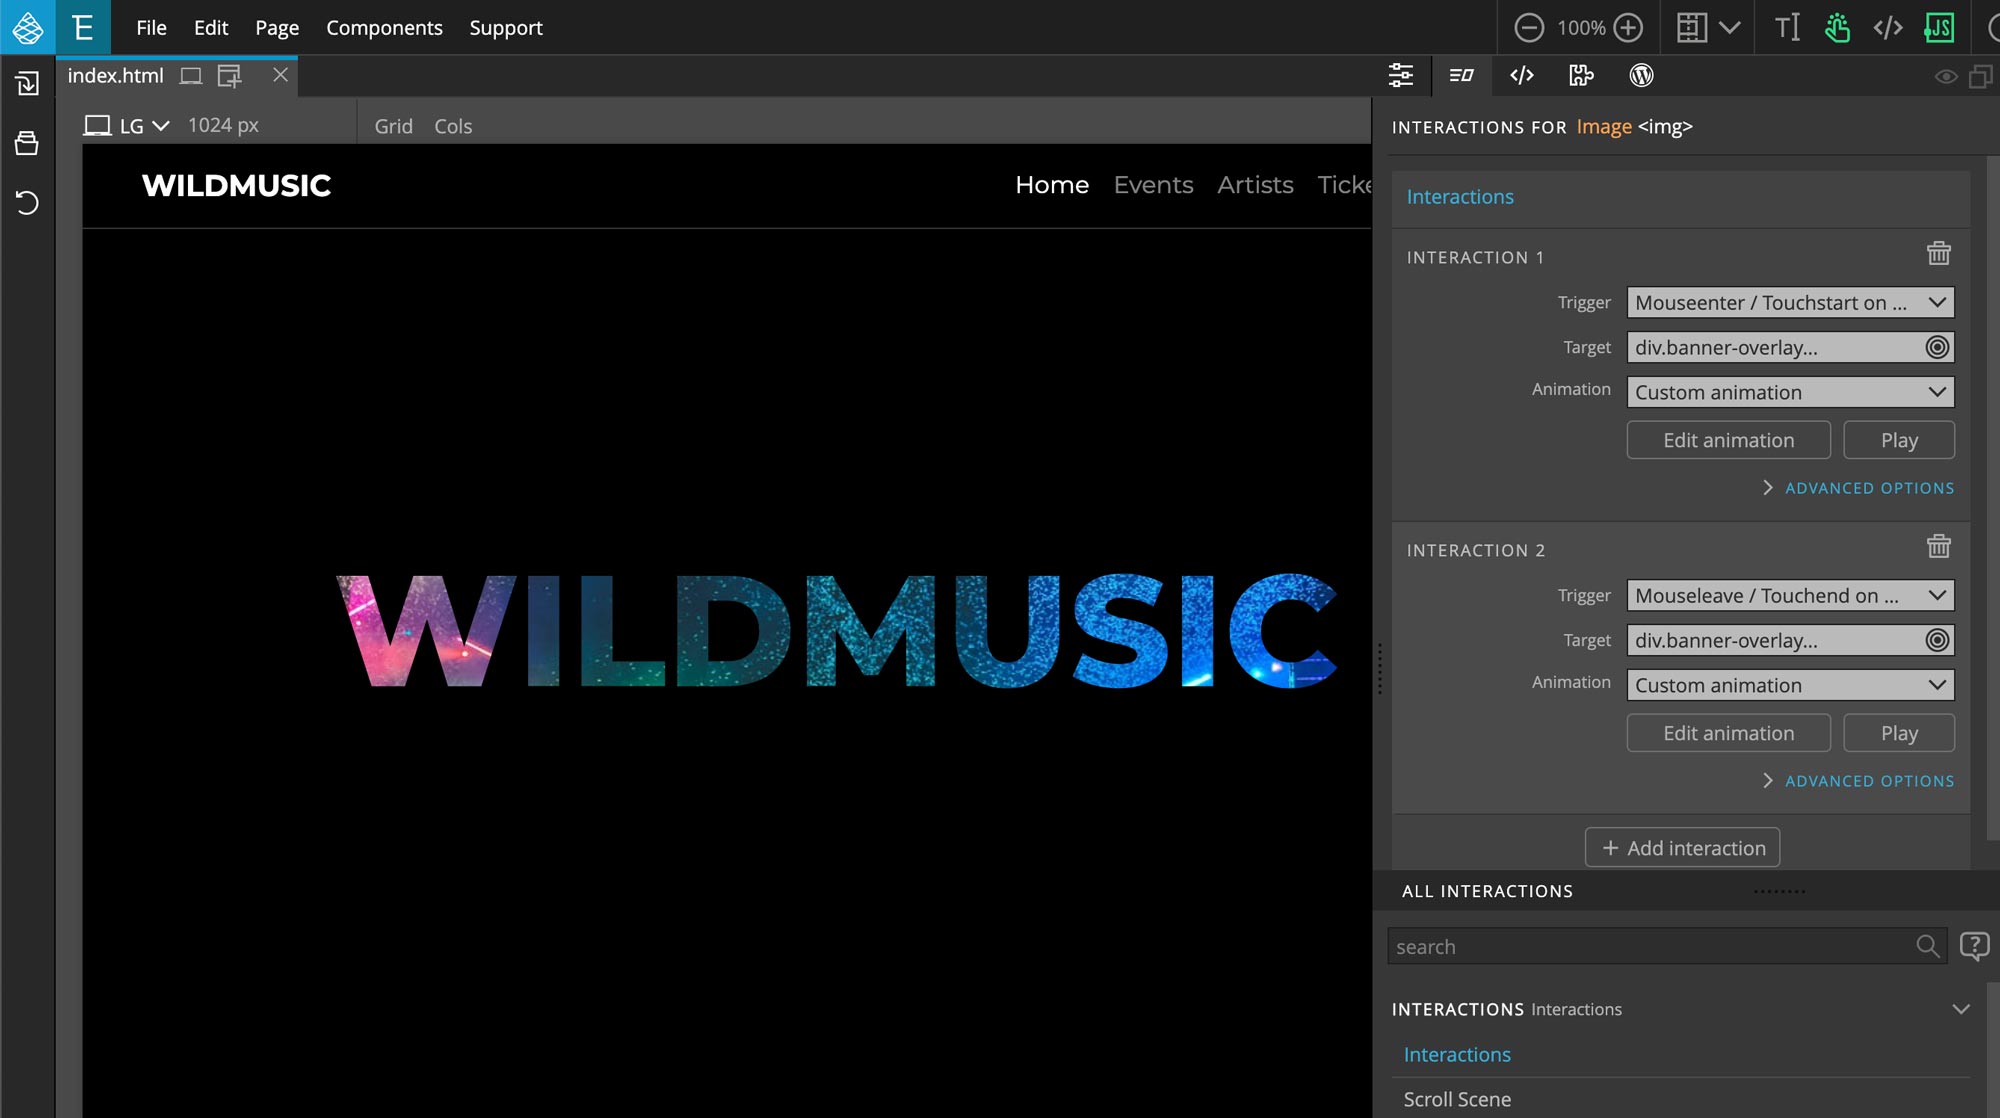
Let’s start with the banner section. Banner section has an image in the background and on the top it has black overlay with a cutout image at the center. This image has a class name .banner-text and because of the cutout we can see the image on the image on the back.
I’m going to add an interaction to the img.banner-text element, not to the top or to the bottom black block. So when we hover over the center image (img.banner-text element) the whole banner overlay should hide and we should see the image on the back. Concept is similar to the CSS hover effect but this approach is not limited to child elements.
Here we have to add two interactions. First to hide the banner overlay when you hover over the image and second to reveal banner overlay when you hover out of the image.
To hide the banner-overlay block on mouse hover:
- Select the img.banner-text from the Tree panel or directly select it from the viewer.
- Go to Interactions panel
- Click on Activate button if Pinegrow Interactions in not already activated
- Select Interactions from Actions list
Interactions settings should appear.
- On Trigger > select Mouseenter/Touchstart
- On Target > choose Select on the page
- Go to Tree panel > click on the DIV with class name .banner-overlay which is parent of this image
We are simply hiding the overlay block so let’s create a custom animation.
- On Animation > select Custom Animation or you can just click on Edit Animation
- Go to Timeline Editor > add new transition
- Set Position value 0
- Set Duration value to 0.2
- Now click on Add property
- Select Opacity > Auto Opacity
- Set value 0 for Auto Opacity
Now if you check the page and hover over the center image (img.banner-text element) you will see the whole overlay block will hide. What we need next is to reveal the overlay block when the cursor is out of the image block. For this we will add new interaction.
To reveal the banner-overlay block:
- Keep the img.banner-text selected
- On Interactions panel > click Add Interaction, Animation 2 should appear
- On Trigger > select Mouseleave/Touchend
- On Target > choose Select on the page
- Go to Tree panel > click on the DIV with class name .banner-overlay like we did earlier
We are going to reveal the overlay block from auto-opacity 0, so let’s create a custom animation similar to before. But this time auto-opacity should be set 1.
- Click on Edit Animation
- Go to Timeline Editor > add new transition and click on transition bar
- Set Position value 0
- Set Duration value to 0.2
- Now click on Add property
- Go to Opacity > select Auto Opacity
- Set value 1 for Auto Opacity
One last thing we should do for both interactions is:
- Click on Advanced Options
- And check Restart on Play
This makes sure that animation will replay when the interaction is triggered again and again.
Let’s check the page, you should see the banner overlay reveal and hide as you hover in and out of the center image (img.banner-text element).
3. Zoom & Pin the Header
Now let’s move on to the next interaction where I want the banner overlay to zoom and hide as I scroll. This way we’ll have the effect like seeing through the word WILDMUSIC and revealing the whole background image.
For Scroll Scene interaction let’s select the parent section from the Tree panel. This section has a class name .banner-section.
- From the Actions list > select Scroll Scene, scroll scene settings should appear
- On Animation 1 > on Target > go to div.banner-overlay > on the popup select .banner-overlay
- Now let’s create a custom animation, click on Edit Animation
- Go to Timeline Editor > add new transition and click on transition bar
- For the first one select type Set
- For Position enter value 0
- Click on Add Property > go to Opacity > select Auto Opacity
- Set value 1 for Auto Opacity
- Again click on Add Property > go to Transform > select Scale
- Set value 1 for Scale as well
Now let’s create the main transition
- On Timeline Editor > add new transition and click on transition bar
- Transition Type should be kept as Tween
- For Position enter value 0
- For Duration enter value 0.5
- Now click on Add Property > go to Opacity > select Auto Opacity
- Set value 0 for Auto Opacity
- Again click on Add Property > go to Transform > select Scale
- Set value 20 for Scale
Now if you check the page you should see the banner-overlay is already zoomed in. This is because the scroll position of this block is already in the scene. So some portion for the animation is already running.
Also you can check on the Scroll Scene settings. Start on has a default value selected as Enter. This means, on this Scroll Scene animation starts as the block enters the view.
We can fix that by updating how Scroll Scene interaction starts and ends. Now let’s update Start and End setting.
- Go to Scroll Scene setting
- Click on Start and End
- On Start and End option choose Leave
For now to check the animation in effect
- Go to Scroll Scene setting
- And select Leave on Start on
Now if you check the page, banner-overlay should zoom in and fade out as we scroll.
So now one extra trick we can apply here is to make this section stick to view until banner-overlay fades out and we see the background image.
There is a really easy option for this. On the same Scroll Scene settings there is an option for Pin Scene, click on the checkbox to enable it. Now if you check the page that section will remain fixed to our view until the animation completes.
This animation also feels quite longer, so let’s make it a little shorter.
- Go to the same Scroll Scene setting
- And on Duration enter value 50%
This animation also feels quite longer, so let’s make it a little shorter.
- Go to the same Scroll Scene setting
- Click on Start and End
- And for Duration enter value 50%
By the way, the default value here is 200% which is the same as two viewport heights.
One thing you should notice here is that when banner-overlay is zoomed in and if our cursor moves inside the image on the center. Scroll Scene auto-opacity will not work, as our banner-text image mouseover interactions also have auto-opacity animation which will overwrite it.
So what we need to do here is when our Scroll Scene interaction is running, banner-text mouseover interactions should not run. For this we can apply a trigger condition which has two options. To run animation when the element has a certain class name or to run the animation when the element doesn’t have a certain class name.
So what we should do is to apply a class name to the banner-text image when Scroll Scene is running.
But first let’s apply Trigger condition on banner-text image
- Select banner-text image
- On Animation 1 > click on Advanced Options
- On Trigger condition > select doesn’t have class
- Trigger condition value option should appear below
- Enter a class name in value, here I’m going to type in-scroll
Now do the same thing for Animation 2
- On Animation 2 > click on Advanced Options
- On Trigger condition > select doesn’t have class
- Trigger condition value option should appear below
- Enter a class name in value, here I’m going to type in-scroll
Now we have to add class name in-scroll on Scroll Scene
- From the Tree panel, select the section with the class name .banner-section
- On Scroll Scenes settings > click Edit Animation
- On Timeline Editor > click on blue transition bar
- Click on Add Property > go to Class > select Add class
- On Add class value enter in-scroll
Now to make sure there won’t be the class name applied in the start of the Scroll Scene, we need to remove it with our interaction.
- On the same Timeline Editor > click on the purple transition bar
- Click Add Property > go to Class > select Remove class
- On Remove class value enter in-scroll
Now we have to add class name in-scroll through Scroll Scene
- From the Tree panel, select the section with the class name .banner-section
- On Scroll Scenes settings > click Edit Animation
- On Timeline Editor > add new transition
- Select the type Set
- For Position enter value 0.01
- Click on Add Property > go to Class > select Add class
- On Add class value enter in-scroll
Now to make sure there won’t be the class name applied in the start of the Scroll Scene, we need to remove it with our interaction.
- On the same Timeline Editor > click on the first transition bar which position is set to 0
- Click Add Property > go to Class > select Remove class
- On Remove class value enter in-scroll
Let’s check the page and when you scroll a little and hover over the banner-text image, mouseover interaction should not work.
So now banner-overlay interaction is done.
One more interaction I’d like to add is to hide the navigation and only reveal it as the banner-overlay scroll scene is complete.
First let’s hide the navigation block
- Select the navigation block from the Tree panel
- From Actions list click on Hide at start
Now let’s add fade in effect to reveal the navigation block
- From the Tree panel, select the section with the class name .banner-section
- On Scroll Scenes settings > click Add Animation, Animation 2 should appear
- On Target > click on select on the page
- From Tree panel > click on navbar block
- On Animation > go to Fading Entrances > select FadeIn
- Click on Advanced Options
- On Play > select Independently
- For Duration enter 0.3, to make this animation little quicker
One thing we should do here is, this animation should start at the end of the scroll scene. For that, on Start at % enter value of 100%
- On the same Advanced Options
- On Start at % > enter 100
One last thing we should do is to enable Reverse in opposite direction option which makes sure the navigation block hides again when scrolling up.
- On the same Advanced Options
- Enable Reverse in opposite direction option
Now check the page and you should see navigation reveal and hide when we scroll.
4. Event Section Reveal & Parallax
Now let’s move on to the Event section. Here we are going to add vertical parallax effect on the title, reveal effect on the text contents and horizontal parallax effect on the images block at the bottom.
We are going to implement a scroll scene here so let’s select the main section.
- On Tree panel select section with a class name .event-section
- From Actions list > click on Scroll Scene
- Go to Scroll Scene setting
- Click on Start and End
- On Start and End option choose Enter
- On Animation 1 > on Target > go to h2.floating-title > on the popup select .floating-title
- Click on Edit Animation
- Go to Timeline Editor > add new transition and click on transition bar
- Transition Type should be kept as Tween
- For Position enter value 0
- For Duration enter value 1
- Click on Add Property > go to Transform > select Y
- For Y set value -50vh
Now refresh and check the page and you should see parallax effect on the title text as you scroll.
Now let’s add a reveal effect on the contents
- On the same Scroll Scene, click on Add animation button at the bottom
- Now on Animation 2 > on Target > head over to the DIV with class name .event-details > on the popup click on .event-details
- On Animation > go to Fading Entrances > select FadeInUp
- Now click on Advanced Options
- On Play > select Independently
Now if you refresh and check the page you should see the reveal effect as you scroll to that section.
I feel this animation is a little slow and I want it to start after a little delay.
- On Start at % enter value of 20
- And for Duration enter value 0.5
As we are adding reveal effect, let’s not forget to add Hide At Start to .event-details block.
- On Tree panel select .event-details block
- From Actions list click on Hide At Start
Now if you refresh and check the page it should reveal the .event-details block a little quicker and after it is 20% into the scene.
Now let’s move on to the other section, the horizontal image block at the bottom. We are going to move this block right to left as we scroll. So let’s add a new scroll scene on the container, which has a class name h-scrolling-block.
- From the Tree panel click on the DIV with the class name .h-scrolling-block
- On Interactions Actions list > click on Scroll Scene
- On Animation 1 > on Target > select the direct child of the current element, this one has class name .row
This block has to go left as I scroll down, so we are changing the X position of this block. So let’s create a custom animation.
- Click on Edit Animation
- Go to Timeline Editor > add new transition and click on transition bar
- Transition Type should be Tween
- For Position enter value 0
- For Duration enter value 1
- Now click on Add Property > go to Transform > select X
- For X enter value -100vh
Now check your page and you should get an effect like the block is scrolling in horizontal direction as you scroll the page.
Now let’s move on to the section below which is another event-section. It is similar to the section above but doesn’t have a title text. So here we are going to use copy/paste as we are going to add similar interactions from the previous section.
First let’s copy the reveal effect.
- Go to first event-section and click on it
- Interactions should appear on the Interactions panel
- Hover over the title of Scroll Scene and click on Copy button
- Now go to .event-section below and click on it
- And press Ctrl + V (or Cmd + V on mac)
Now you should see the reveal effect applied to .event-details section. Also don’t forget to add Hide At Start to this section.
- On Tree panel select .event-details block
- From Actions list click on Hide At Start
Now let’s come to Scroll Scene interaction on the main section again. As you can see here we have copied the interaction from above which has two animations. Since we don’t need the title parallax effect on this section, we can just simply delete Animation 1 from this Scroll Scene.
To do this, just head over to Animation 1 and click on the delete button.
Here we also have .h-scrolling-block like in the section above. I need this section to go right when I scroll down. Which is opposite of the top .h-scrolling-block, so we can just copy above interaction and with a minor change we can achieve that.
- On Tree panel > click on the .h-scrolling-block
- Hover over the title of Scroll Scene and click on Copy button
- Now let’s select .h-scrolling-block on the section below
- And press Ctrl + V (or Cmd + V on mac)
Now if you check the page both .h-scrolling-block should move in the same direction. Now let’s make the second one move in the opposite direction.
- Second .h-scrolling-block should be selected
- On Animation 1 > click on Edit Animation
- Go to Timeline Editor > click on blue transition bar
- Here X has -100vh value so just remove the – and change the value to 100vh
Now check the page and as you scroll both .h-scrolling-block should move in the opposite direction.
5. Recent Events Parallax & Reveal
Now let’s move on to the Recent Event section. Here we are going to add the same parallax effect on the title text and reveal effect on the link blocks.
For the parallax effect on the title text we are going to again copy it from above. So let’s go to the first .event-section
- Click on the .event-section block
- Copy the interaction from Interactions panel
- Go to .recent-event-section and click on it
- Now press Ctrl + V (or Cmd + V on mac)
Now if you check the page you should see the title text moving vertically as you scroll.
Also there are two animations on our scroll scene and we don’t need the second one. So let’s go to animation 2 and delete it.
As title text interaction is done, let’s add reveal effect on the links block of this section.
On the same Scroll Scene settings let’s add new animation.
- Click Add animation at the bottom of the scroll scene setting
- On Animation 2 > on Target > go to link element and select .event-link on the popup
This way we are selecting all four link blocks as all of them has the same class name.
- Now on Animation > go to Fading Entrances > select FadeIn
- Click on Advanced options
- On Play > select Independently
Also I want this to trigger after scroll scene is little into the scene, for that
- On Advanced options
- On Start at % event 20
Now if you check the page, reveal effect is not working as it should. This is because .event-link block has CSS transition applied to it. So let’s customize the animation to remove the CSS transition and also I would like to add delay between animations.
- Click on Edit Animation
- On Timeline Editor > click on purple transition bar
- Click on Add Property
- Click on Custom property
- Type transition and press OK button
- For transition enter value none
- Now to add delay between animations, click on blue transition bar
- On Stagger enter 0.25
Now one last thing we should do is to add Hide At Start to all the .event-link blocks. So let’s do that:
- On Tree panel select all the a.event-link blocks, press Ctrl and click on the .event-link blocks one by one
- Now from Actions list click on Hide At Start
Now refresh and check the page you should see .event-link block revealing one by one as we scroll into the scene.
So we have added all the interactions to our WildMusic landing page. Don’t forget to save your project and do check if all the interactions are working. If not you can always go back and check our tutorial from the start.
This concludes the another Tutorial for Animating a Simple Landing Page with Pinegrow Interactions. I hope the video was helpful.
If you’ve any questions please feel free to contact us via email or through the Pinegrow forum.
We will be coming up with more videos related to Pinegrow Interactions and How to videos for creating more interactive animations. So keep watching and following.
Thank you for your time and we will see you in the next video.